Saved by the Kale

Healthy living is Happy living

Navigation
  • Home
  • Recipes
    • Appetizers
    • Breakfast
    • Entrees
    • Desserts
    • Gluten Free
    • Juices
    • Side Dish
    • Smoothies
    • Snacks
  • Minimalism
  • About
    • About Jen
    • About Jim
  • Jen’s Favorites
  • Mindful Intentions
  • Contact

Panang Chicken Curry

January 11, 2017

panang chicken curry

I love Thai food, it’s full of flavor and never boring. I’ve never had a Thai dish that I didn’t like. Over the last couple of years I have realized the importance of knowing the ingredients that goes into my food.

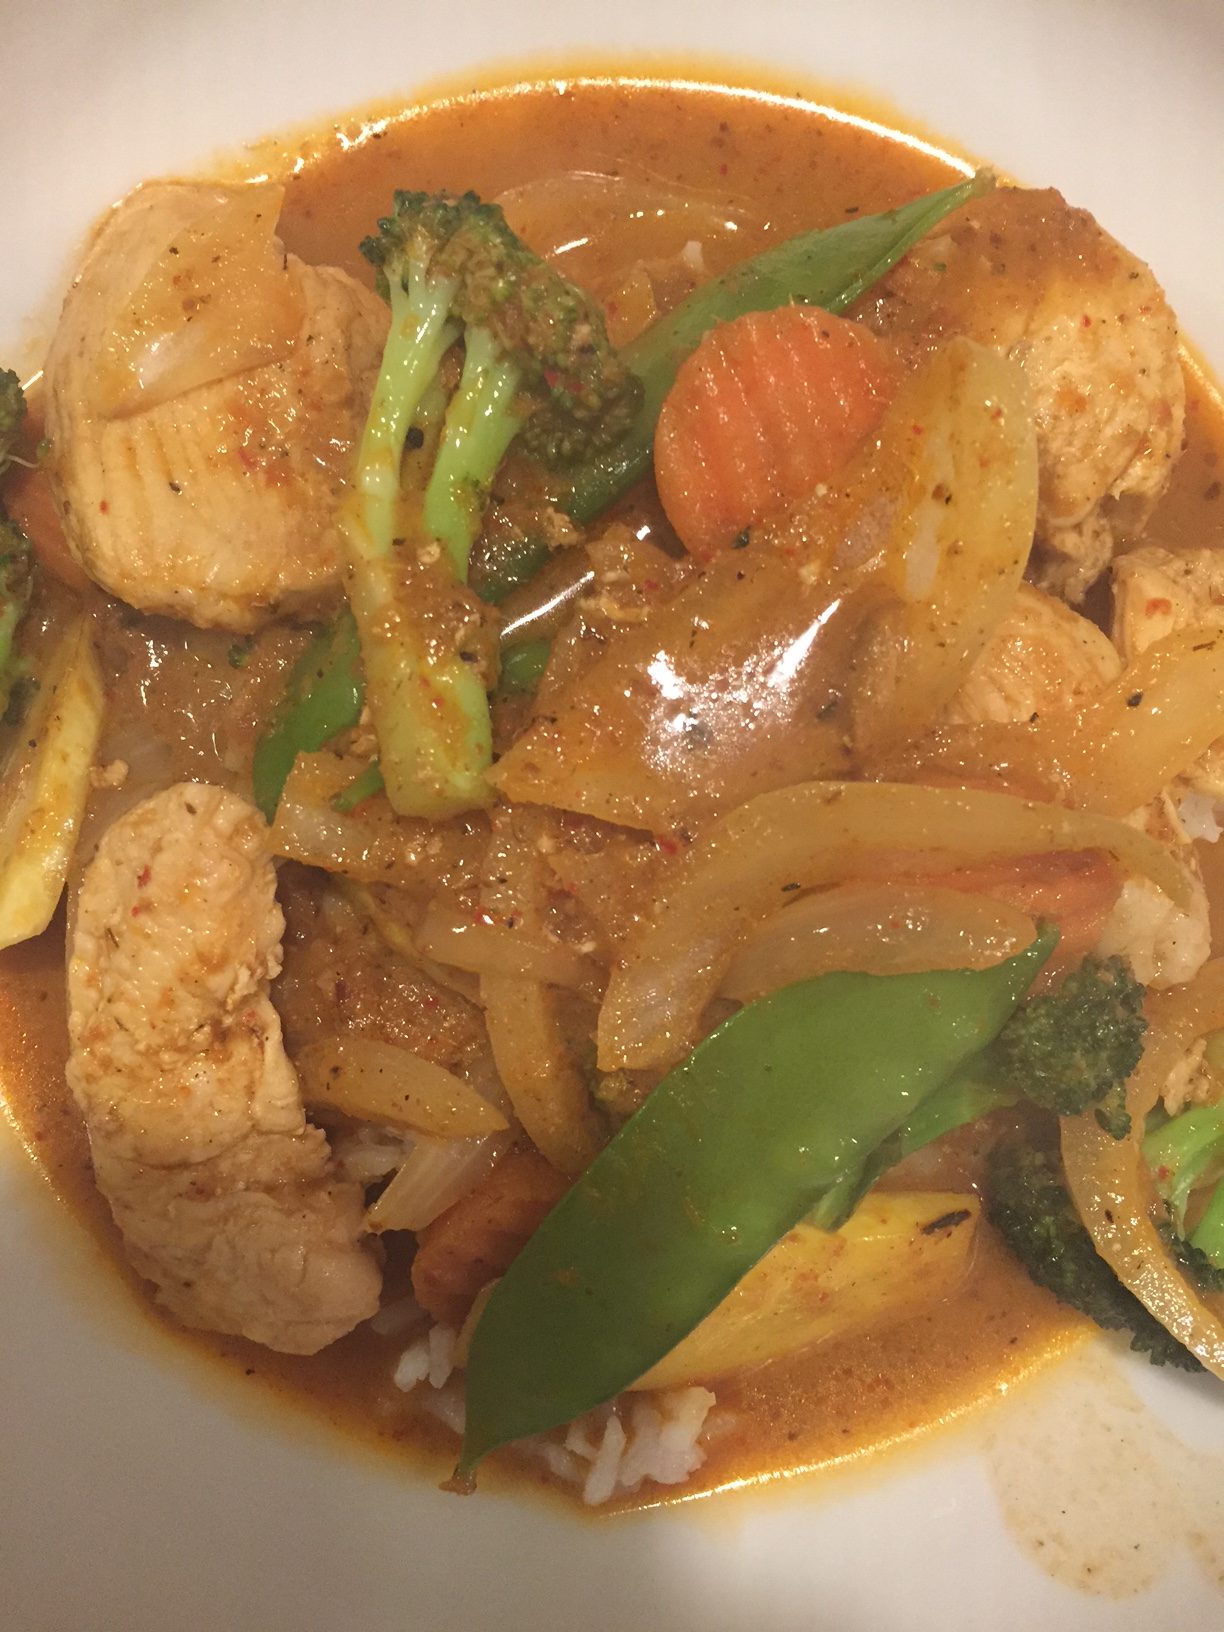
When it comes to sauces and oils at restaurants it can be a crapshoot. It is amazing where they can slip in soy, gluten, dairy, and sugar in places you wouldn’t even think to look. Because of this we cook the majority of our food at home. This year we decided we wanted to learn to make curry. We did some research and decided to purchase this curry paste (affiliate link). I carefully checked the ingredients and knew what they all were. It didn’t have any of the things that I try to stay away from. We purchased it and a few days later we were on our way to having delicious Panang Curry.

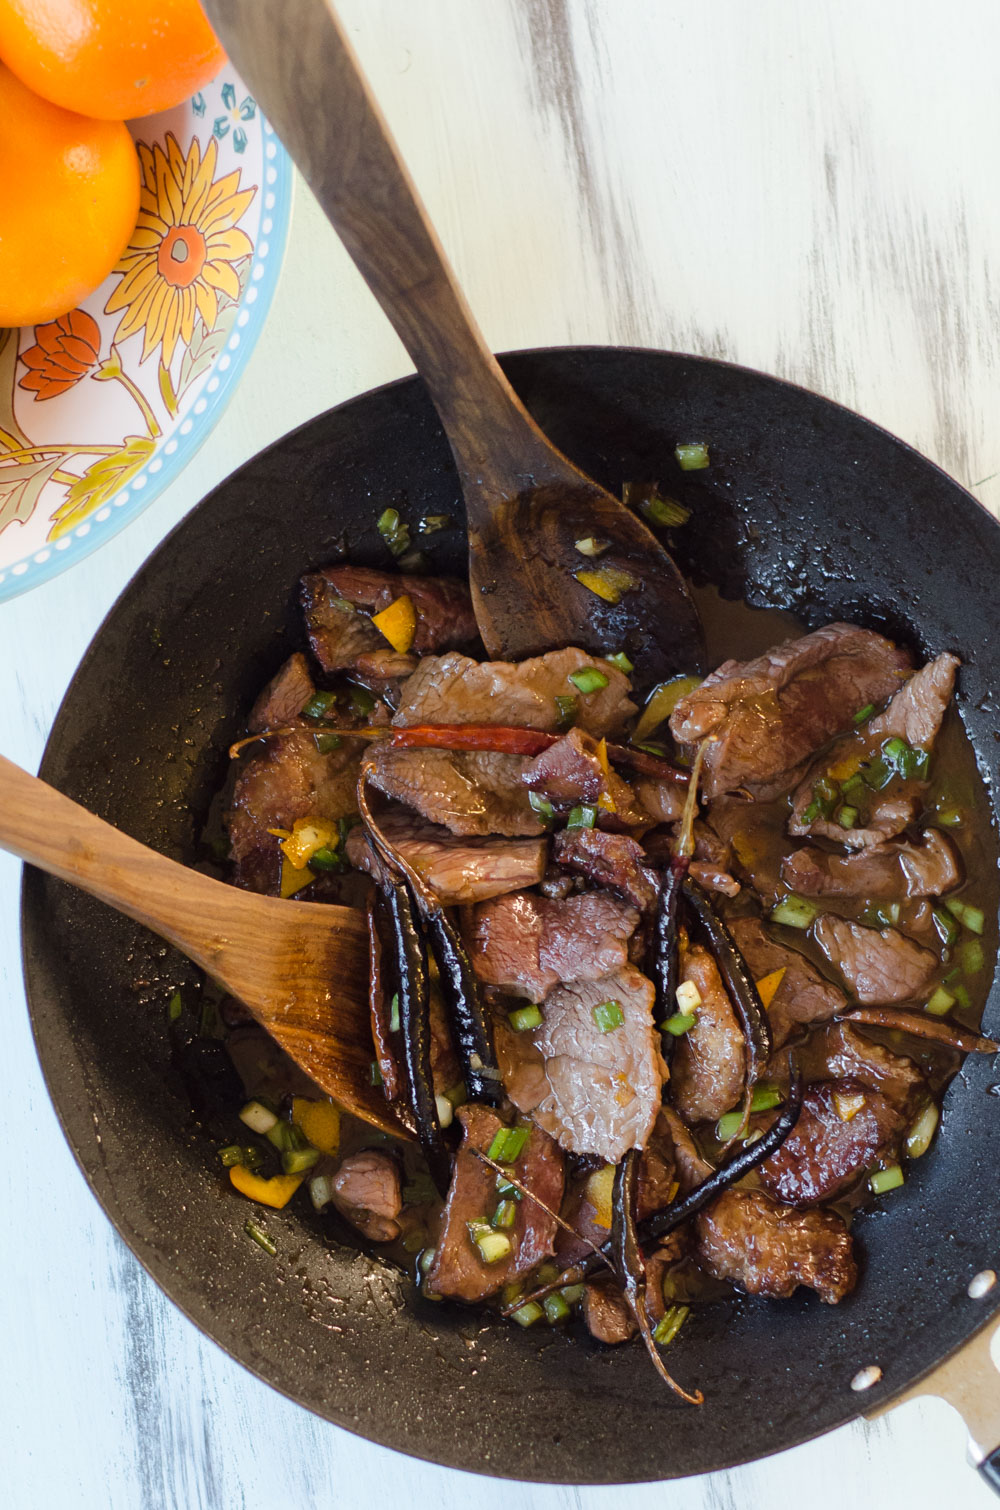
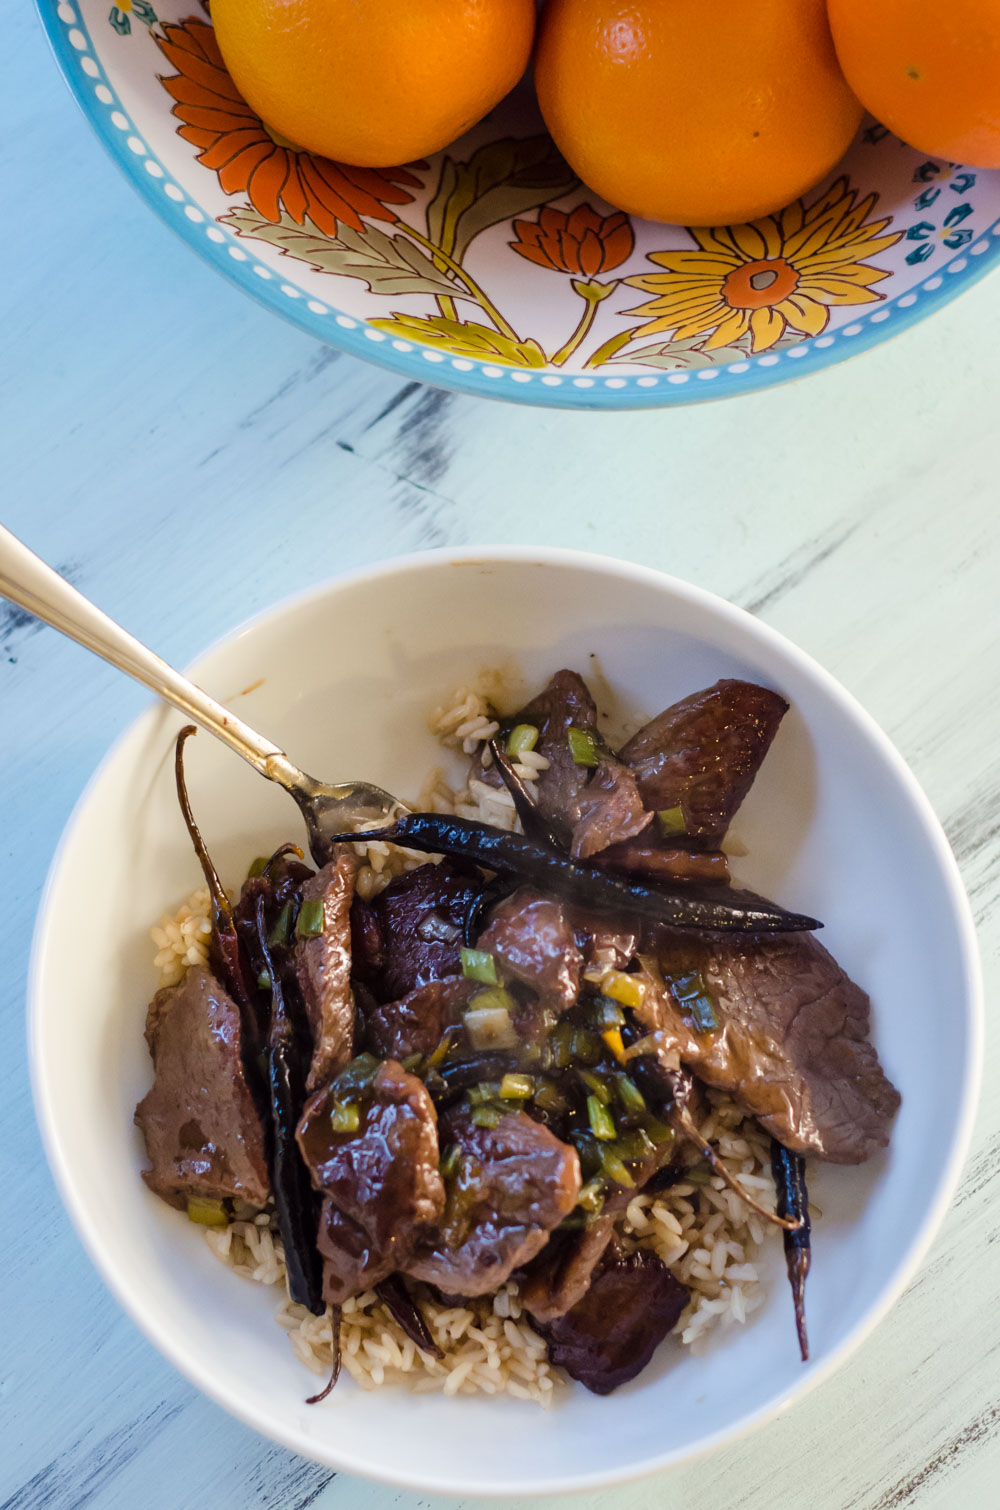
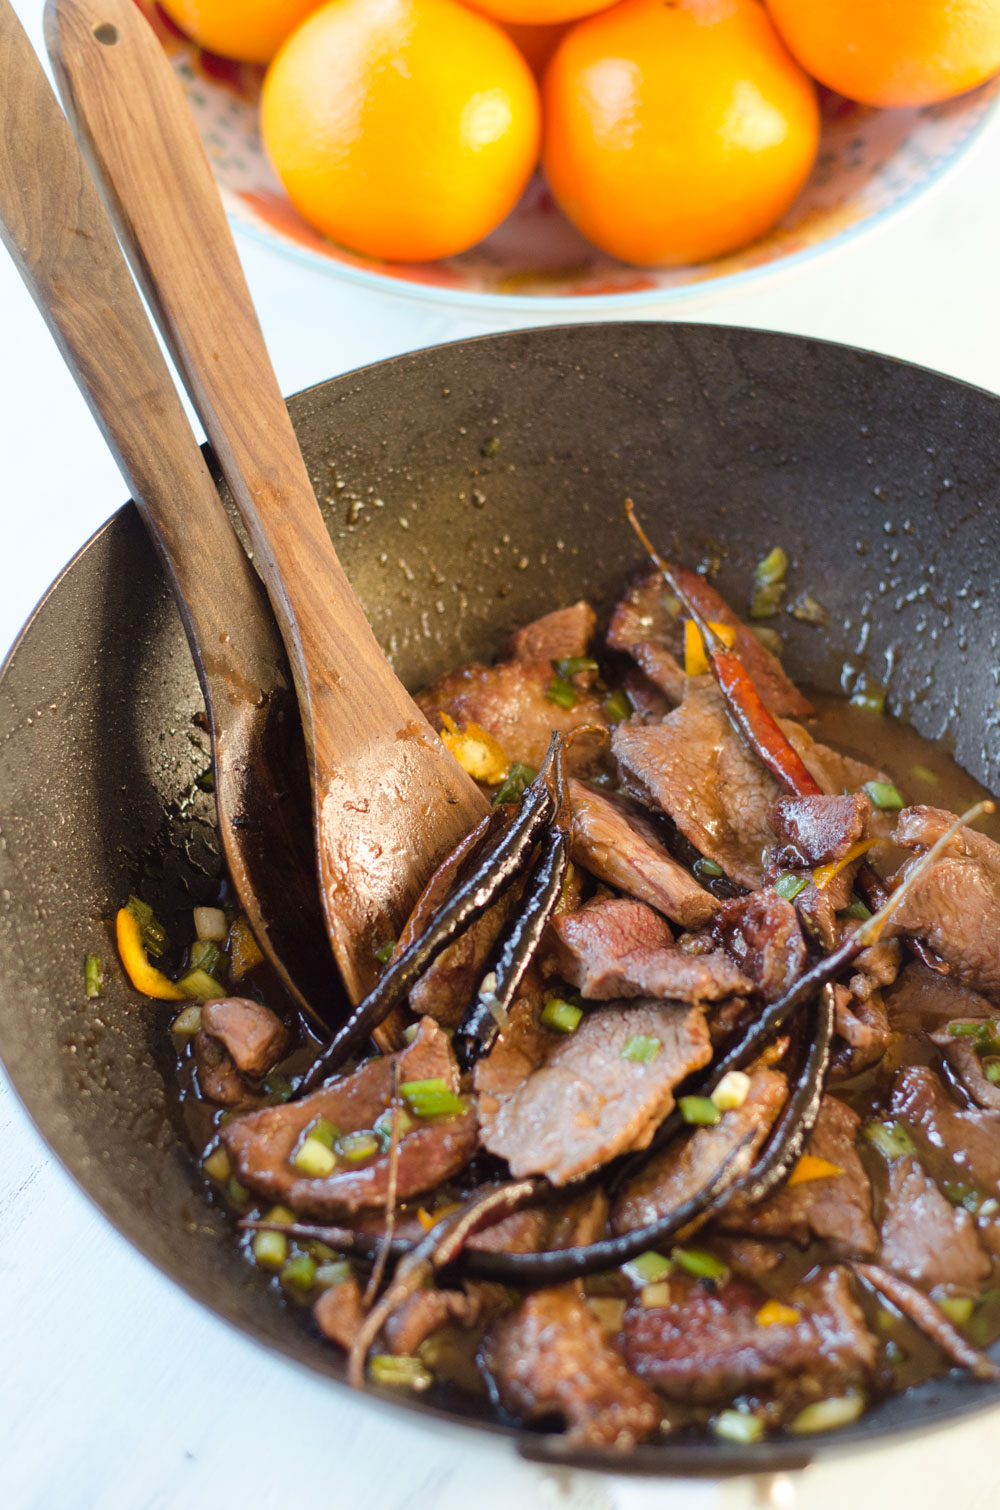
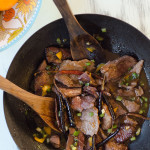
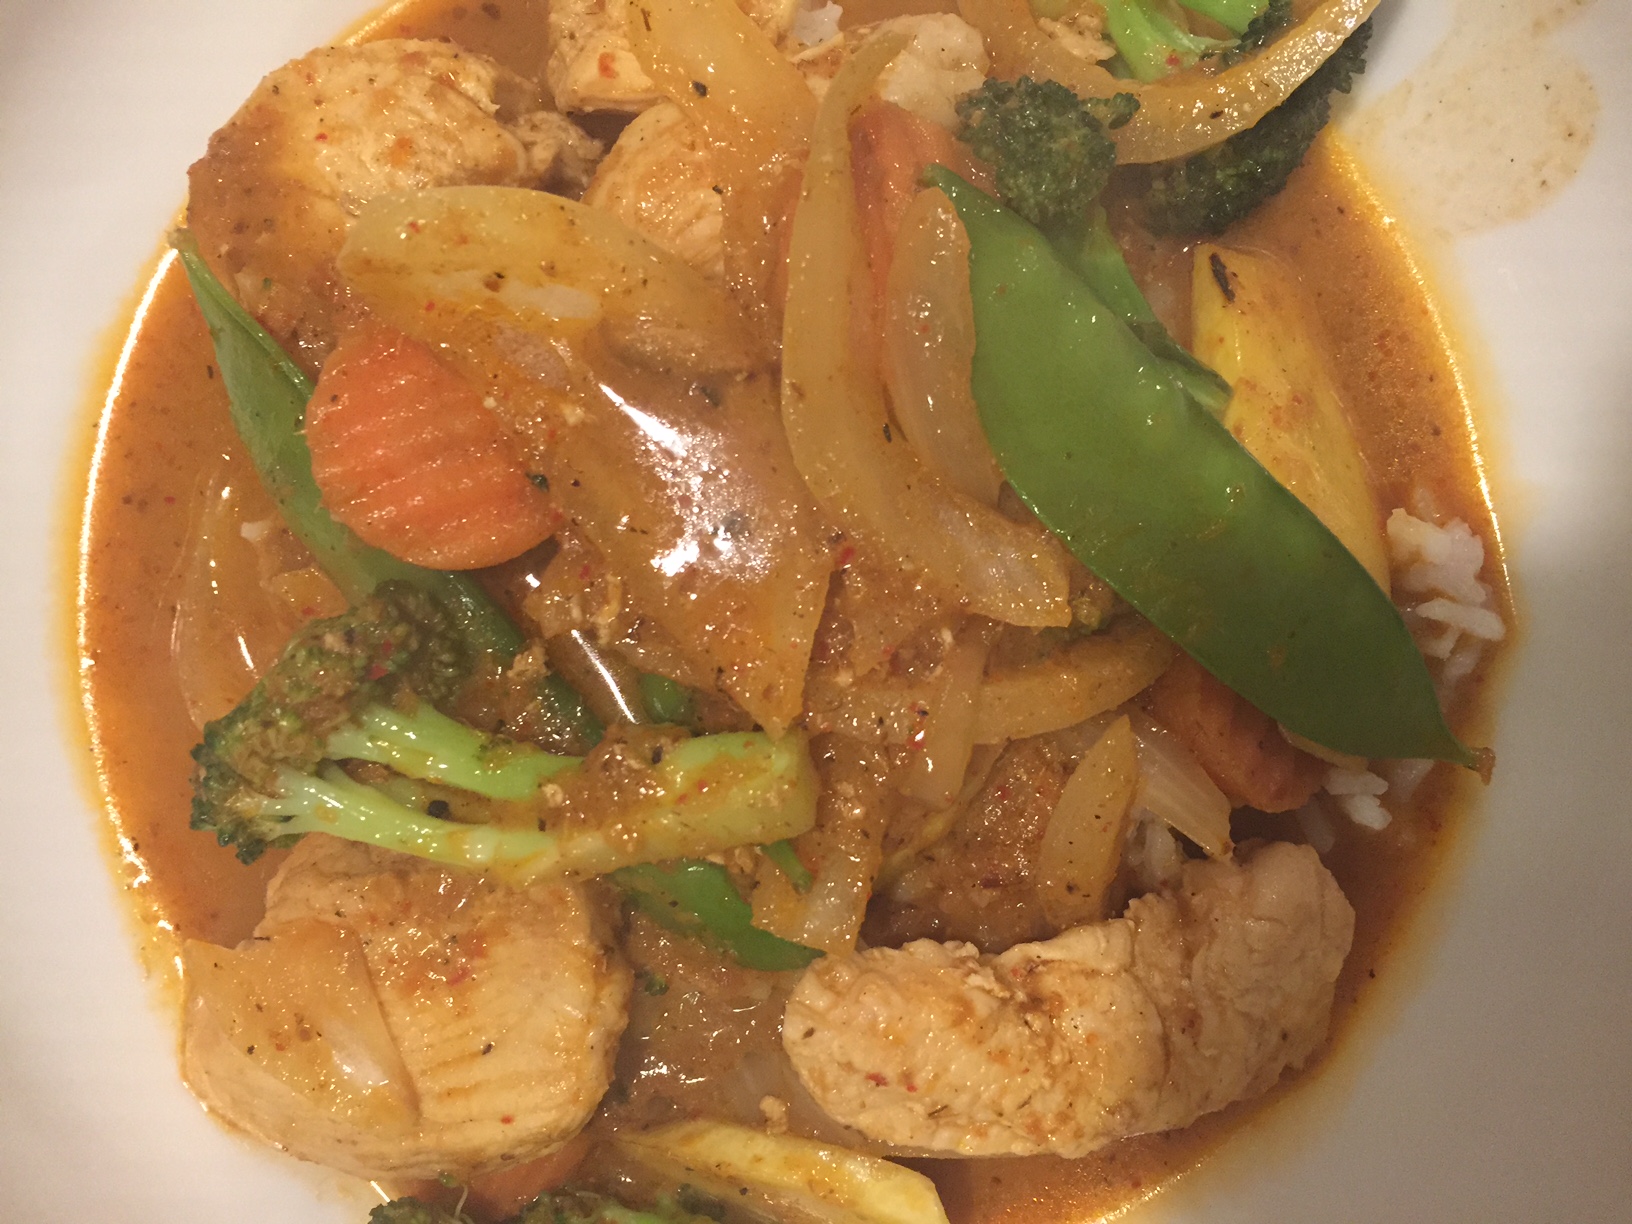
We chose to make it with chicken but you could use any kind of protein you like. Beef, Shrimp, or even just vegetables would be great! This is completely customizable you could add any vegetables you like. We chose to use onions, snow peas, carrots, squash, and broccoli. 

Panang Chicken Curry
2017-01-10 21:37:07
A sweet and spicy dish that is gluten free, soy free and dairy free.
Write a review
Save Recipe
Print
Prep Time
10 min
Cook Time
30 min
Total Time
40 min
Prep Time
10 min
Cook Time
30 min
Total Time
40 min
Ingredients
  1. 2 TBSP Panang Curry Paste (We use Mae Ploy Thai Panang Curry Paste - 14 oz jar)
  2. 2 1/2 C Coconut Milk
  3. 1/3 C Water
  4. 1 C Onion (sliced)
  5. 1 C Broccoli
  6. 1/2 C Snow Peas
  7. 1 Yellow Squash (sliced in chunks)
  8. 1 TBSP Coconut Sugar
  9. 2 TSP Salt
  10. 2 TBSP Coconut Oil
  11. 1 LB Chicken Breast (cut into chunks)
Instructions
  1. Using coconut oil as needed, work in batches to stir-fry the chicken and vegetables in a wok. Remove from wok when finished.
  2. Use 1 tsp of coconut oil to stir-fry the curry paste.
  3. Then add coconut milk and water to the paste and bring to a boil while stirring to incorporate the paste.
  4. Add the chicken and vegetables back to the wok.
  5. Stir together well and let it cook together for 2 minutes and then you are done!
  6. Serve over rice.
Notes
  1. This can get pretty spicy, so feel free to add extra coconut milk or water to tone down the heat a bit. Conversely, add a little more curry paste if you want more heat.
By Jen @ SavedbytheKale
Saved by the Kale https://savedbythekale.com/

Filed Under: Entrees, Gluten Free Tagged With: curry, dairy free, gluten free, panang chicken curry, soy free, thai food

Vietnamese Fresh Basil Spring Rolls

January 27, 2016

These rolls are fresh and loaded with flavor and  veggies! You will not be able to eat just one, I promise! Bonus: these rolls are very healthy and will fit almost any kind of diet. They are gluten free and vegan. This recipe is also great for anyone on an elimination diet.

spring rolls

I know we are in the middle of winter but that doesn’t mean it’s not the perfect time to eat something fresh and light. These rolls are so versatile. I love to use basil in mine, but they would also be great with fresh mint or cilantro. You could switch out the veggies, play around and make it to your particular taste. 

fresh veggies for spring rolls

These came together very quickly. It’s a good idea to have all your veggies chopped up before you get started putting your rolls together. I find it works best to put all your fillings together in the middle of the wrap and then roll it up tight like a burrito. The rice paper is very flexible just make sure you do not get it too soft or it will rip when you try to roll it together, but if you follow the directions according to the package it will work great!

Vietnamese Spring Rolls

Soy is off limits to me but I have found I love Coconut Aminos even more and it is the main ingredient for the sauce to dip these delectable rolls in. 

Vietnamese Fresh Basil Spring Rolls
2016-01-21 18:32:23
Yields 10
These rolls are filled with fresh veggies and are perfect as an appetizer or a meal.
Write a review
Save Recipe
Print
For the Rolls
  1. 2 carrots (shaved with a vegetable peeler)
  2. 2 cucumbers (sliced thinly)
  3. 1 avocado (sliced)
  4. handful of fresh basil
  5. 2 green onion tops
  6. thin rice noodles
  7. 10 Vietnamese spring roll rice wrappers
For the Sauce
  1. 1 tsp of minced garlic
  2. 1 tsp of chopped ginger
  3. 1/3 cup of coconut aminos
  4. 1 green onion top
Instructions
  1. Begin by chopping all the vegetables.
  2. Then cook the rice noodles according to the directions on the package.
  3. When the rice noodles are done get a bowl of warm water to prepare the rice wrappers.
  4. Dip the wrappers into the warm water until they begin to get soft. You want them soft but still a little firm because they will soften up as you are working with them,
  5. Lay the wrapper out flat on a cutting board and put all your veggies, basil and the rice noodles in the middle of the wrapper. Roll them up like you would a burrito. You can fold them ends in or leave them open. Be sure that you do not stack the completed rolls as they will stick together.
  6. To make the sauce you will need a small sauce pan. Combine all the ingredients and gently cook for about 5 minutes and you are done!
Notes
  1. If you have left over rolls you can wrap them each individually in saran wrap and store in the refrigerator up to two days.
By Jen @ SavedbytheKale
Saved by the Kale https://savedbythekale.com/


Filed Under: Appetizers, Elimination Diet, Entrees, Gluten Free, Meatless, Recipes Tagged With: dairy free, elimination diet, fresh, gluten free, soy free, vegan, vegetarian, vietnamese spring rolls, wheat free

Cara Cara Oranges

January 14, 2015

This post is sponsored by Melissa’s Produce. Their steamed veggies and fresh fruit are some of my favorite grocery items. We used Melissa’s delicious Cara Cara Oranges to make both of the recipes below. Enjoy!

Down here in South Georgia we have access to lots of Florida oranges this time of year. If you cross the state line going into Florida right now you see fruit stands setup everywhere and piles of oranges, grapefruit, and any other citrus you can think of. My thoughts on oranges changed quite a bit when I got my hands on a box of Cara Cara Oranges from Melissa’s. They are the sweetest, best-tasting oranges that I’ve ever had. Plus their ruby red colored flesh is super juicy. Making fresh squeezed OJ from these beauties is a wonderful breakfast treat right by itself.

Cara Cara Oranges

I wanted to make something worthy of these beautiful oranges, and we’ve been on a bit of an Asian cooking kick lately, so we came up with Orange Peel Beef. It’s a dish that you see in some Chinese restaurants, but it’s not that common around here. It’s one of Jim’s favorite Chinese dishes and we haven’t had it in quite a while, so we decided to give it a go. The Orange Peel Beef has a double-dose of Cara Cara Orange in it (both juice and orange peel), so it’s definitely citrusy. 

Orange Peel Beef

Orange Peel BeefOrange Peel Beef Recipe

Orange Peel Beef with Cara Cara Oranges
2015-01-10 16:49:17
Our take on the Chinese restaurant favorite. Made with delicious Cara Cara Oranges from Melissa's Produce.
Write a review
Save Recipe
Print
Prep Time
10 min
Cook Time
25 min
Total Time
35 min
Prep Time
10 min
Cook Time
25 min
Total Time
35 min
Ingredients
  1. 1/2 C plum sauce
  2. Juice from 1 1/2 oranges (we used Cara Cara oranges)
  3. Peel from 1/2 orange, sliced into strips
  4. 1 tbsp soy sauce
  5. 1 lb sirloin roast, sliced thinly
  6. 3 tbsp oil (your favorite type of oil will work fine)
  7. 6 green onions, chopped
  8. 5-6 dried chiles (optional)
Instructions
  1. Heat a wok over high heat until very hot
  2. Add oil and stir fry beef and chiles for 2-3 minutes. Remove beef and reserve.
  3. Add green onions and stir fry for about 2 minutes, until softened.
  4. Add plum sauce, orange juice, and orange peel. Cook for 2-3 minutes, stirring constantly.
  5. Add beef to sauce and heat thoroughly, about 2 minutes.
  6. Serve over brown rice.
Notes
  1. You can adjust the heat level of the dish by adding/removing chile peppers and/or cooking them longer.
  2. We like to serve this over brown rice, but white rice or noodles would work just fine.
By Saved by the Kale
Saved by the Kale https://savedbythekale.com/
For the last few weeks I’ve been doing smoothies for breakfast most mornings. Lately my smoothies have been pineapple and banana, but I decided to switch things up and use the Cara Cara Oranges one morning. It was a simple-yet-delicious smoothie that would work well with any type of orange, but the Cara Caras definitely take it over the top.

Cara Cara Orange Smoothie-2

Cara Cara Orange Smoothie
2015-01-10 16:51:32
A simple and delicious smoothie made with super sweet Cara Cara Oranges from Melissa's Produce.
Write a review
Save Recipe
Print
Prep Time
5 min
Cook Time
1 min
Total Time
5 min
Prep Time
5 min
Cook Time
1 min
Total Time
5 min
Ingredients
  1. 8 oz coconut water
  2. 1 banana
  3. 1 Cara Cara Orange, peeled
  4. 1/2 inch ginger, peeled
Instructions
  1. Add ingredients to blender and blend until smooth.
By Saved by the Kale
Saved by the Kale https://savedbythekale.com/
Cara Cara Orange Smoothie

This smoothie would be great anytime of the year but it is particularly good right now. It is a great boost to your immunity with the ginger and also all the vitamin C from the oranges to help keep your body in tip top shape! 

These Cara Cara Oranges are so versatile, they can take you from breakfast all the way to dinner! The possibilities are endless! 

 Thanks again to Melissa’s for sponsoring our post. Check out Melissa’s full selection of fresh fruit!

Filed Under: Drinks, Entrees, Recipes Tagged With: beef, Cara Cara oranges, orange peel beef, orange smoothie, oranges, sponsored

Shrimp Fried Brown Rice

January 6, 2015

I love Chinese food. Fried rice is one of my favorite things ever, but I try not to eat it very often. I’m not a big fan of white rice, I would much rather eat brown. I’m sure it’s fairly common and most of you have had it somewhere, sometime, but Jim and I haven’t ever had fried rice made with brown rice. There shouldn’t be much difference, right? Other than brown rice taking a ridiculously long time to cook, that is.

Shrimp Fried Brown Rice

We’ve made fried rice many times before, usually with some form of chicken as the protein. We were chickened-out, so we decided to go with shrimp this time around. Shrimp is actually much easier to work with than chicken because it cooks so quickly. If you already have the cooked brown rice then this recipe takes less than 15 minutes to make. Perfect for a weeknight meal.

 I actually couldn’t tell a difference between white and brown rice in the finished product. There’s enough flavor added that you can’t taste a difference, and having the rice cold from the fridge makes the texture different pretty unnoticeable. If you’re making fried rice at home then I believe fried brown rice is definitely the way to go.

Shrimp Fried Rice (with Brown Rice)
2015-01-06 00:02:52
A slightly healthier take on the take-out classic. Our fried rice uses brown rice and shrimp.
Write a review
Save Recipe
Print
Prep Time
5 min
Cook Time
10 min
Total Time
15 min
Prep Time
5 min
Cook Time
10 min
Total Time
15 min
Ingredients
  1. 1/2 lb shrimp, peeled and deveined
  2. 1 tbsp grated ginger
  3. 1 tbsp minced garlic
  4. 1/2 C onion, diced
  5. 1/4 C carrot sticks, or diced carrots
  6. 1/2 C broccoli, chopped
  7. 3 tbsp canola oil (you can use olive oil as well)
  8. 2 C brown rice, cooked and refrigerated overnight
  9. 3-4 dried chiles (optional)
  10. 1/2 tbsp sriracha
  11. salt to taste
  12. 2 tbsp soy sauce
Instructions
  1. Heat wok over high heat until smoking.
  2. Add oil, chiles, and shrimp. Cook until shrimp are almost done, about 2 minutes. Remove shrimp and chiles.
  3. Add veggies, garlic, and ginger. Cook 2 minutes, or until onions are soft.
  4. Add rice, soy sauce, sriracha, salt. Cook for 2 minutes.
  5. Add shrimp & chiles and cook for 2 more minutes.
  6. Serve immediately.
Notes
  1. This is a really flexible stir fry and can use any combination of veggies that you want.
By Saved by the Kale
Saved by the Kale https://savedbythekale.com/
Shrimp Brown Fried Rice

Shrimp Fried Brown Rice

After making this fried rice I have no desire to do Chinese take out again! I think one of the reasons I feel so yuck after eating out Chinese food is because of the high sodium content. Making my own is a much better and healthier way to go. Not to mention it was absolutely delicious!

Filed Under: Entrees, Recipes Tagged With: asian, brown rice, chinese, fried brown rice, fried rice, shrimp, stir fry

  • 1
  • 2
  • 3
  • …
  • 8
  • Next Page »

Hi there!

Hi guys, it's Jen!

I love good food and simple living! Keep Reading…

Search Saved by the Kale

  • Email
  • Facebook
  • Instagram
  • Pinterest
  • RSS
  • Twitter
Follow on Bloglovin

Tasty Food Photography eBook

Features

Infinity Jars

Healthier Alternatives to Store Bought Spice Blends

Cast Iron Pan Pizza Recipe

Homemade Buffalo Chicken Pan Pizza

Chocolate Pumpkin Bread Recipe

Chocolate Chocolate Chip Pumpkin Bread

Copyright © 2023 · Foodie Theme by Shay Bocks · Built on the Genesis Framework · Powered by WordPress