Saved by the Kale

Healthy living is Happy living

Navigation
  • Home
  • Recipes
    • Appetizers
    • Breakfast
    • Entrees
    • Desserts
    • Gluten Free
    • Juices
    • Side Dish
    • Smoothies
    • Snacks
  • Minimalism
  • About
    • About Jen
    • About Jim
  • Jen’s Favorites
  • Mindful Intentions
  • Contact

No Mayo Tuna Salad

December 1, 2014

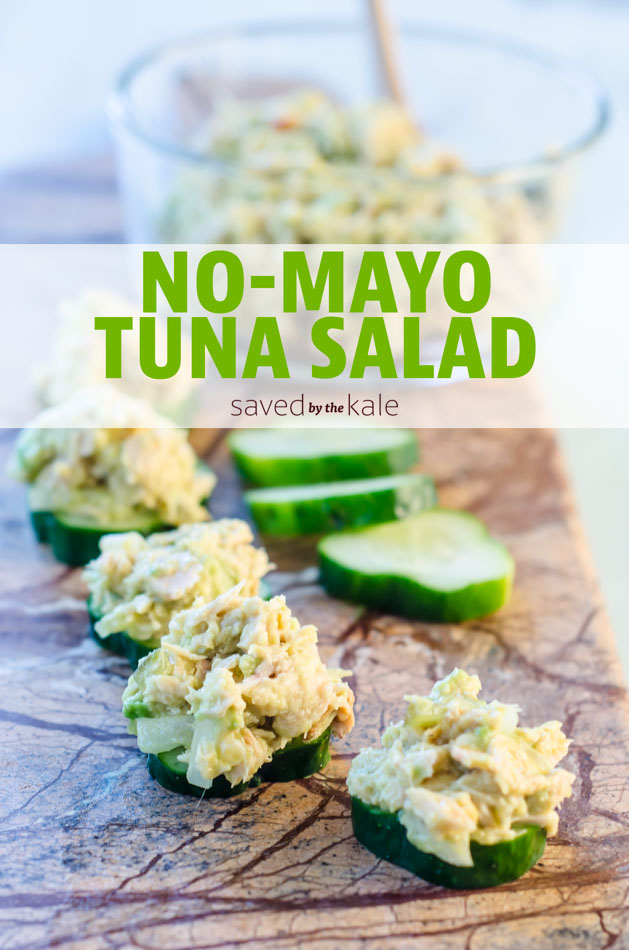
Ever since I was a small child I have disliked mayonnaise. I have no idea why or what I tasted that turned me off but I just did not like the stuff. I would avoid it at all costs. As an adult I still don’t like it. I would never put it on a sandwich. I do sometimes eat things that have mayo in it if it is very well disguised, but honestly I would rather not have it all. Bottom line I just think it is gross. Thankfully there are ways to get around eating things like tuna salad without adding it. Avocados actually make a great substitute for the nasty white stuff. 🙂 

No Mayo Tuna Salad

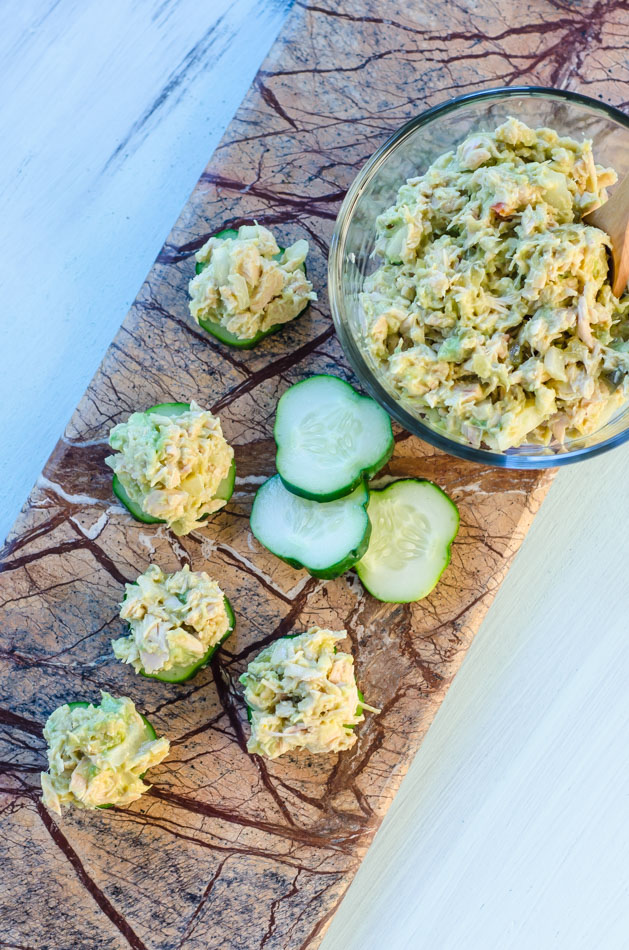
Avocados are a healthy mono-unsaturated fat and are one of the healthiest foods you can eat. I love the way avocados taste but even if you don’t, once you mash it up with your tuna you really do not even know it’s there. 

Now let’s talk about tuna for a second. I am picky when choosing the tuna that I buy and eat. I have tried many kinds, but I will save you some time here. If you want the best then you need to look into buying Wild Planet Albacore Tuna. All of their tuna is cooked only once in the can retaining all of its natural juices and Omega 3 oils, and is packed in the cans with no added water or oil. Their tuna also contains less mercury than other brands. You can absolutely taste the difference. It may cost a little more than other brands but if quality and taste matter to you then Wild Planet is the way to go. This isn’t an ad for Wild Planet, I just enjoy it so much and thought I would share.

Sometimes I eat my tuna salad as wrap using these homemade tortillas, other times I will eat it with pita chips, or dip it up in bell pepper strips or cucumbers. No matter how you like to eat it, if you enjoy tuna salad and are looking for a way to change it up and make it better for you then give this recipe a try!

No Mayo Tuna Salad
2014-11-12 00:57:47
Healthy delicious tuna salad made avocado instead of mayonnaise!
Write a review
Save Recipe
Print
Prep Time
5 min
Cook Time
5 min
Total Time
10 min
Prep Time
5 min
Cook Time
5 min
Total Time
10 min
Ingredients
  1. 1 can of Wild Planet Albacore Tuna
  2. 1/2 of an avocado
  3. 2 tbsp chopped onion
  4. 1 tbsp pickle relish
  5. 1 tbsp jalapeno mustard (or regular mustard)
  6. salt and pepper to taste
Instructions
  1. In a bowl flake the tuna. Then add the avocado and mash together.
  2. Add in the rest of the ingredients and stir until everything is incorporated.
  3. Enjoy!
By Jen @ SavedbytheKale
Saved by the Kale https://savedbythekale.com/
 No Mayo Tuna Salad

Filed Under: Entrees, Snacks Tagged With: avocado, no-mayo, salad, tuna salad

3 Ingredient Oreo Truffles

November 26, 2014

There are always certain foods that I associate with different times of the year. As soon as the Thanksgiving and Christmas holidays come along I think of all things dipped in chocolate. I have several favorites, and they are all very simple to make and taste delicious (more about the others in a later post :)). Sometimes I like to get the kids involved other times I like to turn on some Christmas music, unwind, and dip ALL. THE. THINGS. in CHOCOLATE! Oreo’s have always been one of my favorite cookies and these truffles are like biting into a little piece of heaven! All you need is 3 ingredients and about 30 minutes and you have the perfect holiday treat for parties, school, or to devour yourself.

Oreo Truffles Recipe

photo

3 Ingredient Oreo Truffles
2014-11-25 21:48:43
Yields 27
Easy, Delicious, and always a crowd pleaser! Only 3 ingredients!
Write a review
Save Recipe
Print
Prep Time
10 min
Cook Time
20 min
Total Time
30 min
Prep Time
10 min
Cook Time
20 min
Total Time
30 min
Ingredients
  1. 1 package of Double Stuffed Oreos
  2. 4 oz of cream cheese (softened)
  3. Ghirardelli White Chocolate Melting Wafers
Instructions
  1. Finely chop the entire package of Oreos in a food processor; reserve a little of the crushed Oreo to sprinkle on top of the truffles.
  2. In a bowl mash the softened cream cheese with the Oreos. (Don't be afraid to get your hands dirty!)
  3. Roll into 1 inch balls and place on a cookie sheet covered with parchment paper.
  4. Place in the freezer for 15 minutes.
  5. Melt the white chocolate using a double boiler.
  6. Dip the balls in the chocolate. Completely cover.
  7. Set them back on the parchment paper and garnish with the extra crushed Oreos before they harden.
  8. Let the chocolate set. I like to place them in the freezer for a few minutes because I want to eat them as soon as possible! Refrigerate and Enjoy!
By Jen @ SavedbytheKale
Saved by the Kale https://savedbythekale.com/
Oreo Truffles

And if you are like us you might want to make a double batch because these little things disappear quickly! Between the 4 of us these don’t last long… which makes me think why do I always wait to this time of the year to make them!?

Filed Under: Desserts, Featured, Recipes, Snacks Tagged With: dessert, holidays, oreo, oreo truffles, truffles

Spicy Cajun Boiled Peanuts Recipe

November 12, 2014

Jim here with another one of my favorites – – boiled peanuts! A true Southern staple. In summer and early fall you see boiled peanuts everywhere. Pickup trucks setup on street corners with giant cookers boiling peanuts is a common sight all across the south. 

Boiled peanuts have definitely grown on me over the years. I went for years without touching them, then I would try them a couple times a year, and now I’ve started cooking them myself frequently. If you’ve never had a boiled peanut, it really is kind of liked a cooked pea (hence the nickname “goober peas”). They are soft and take on some of the flavoring that you add. 

Boiled peanuts

My recipe below is a great starting point. Nice and spicy with plenty of salt. However, you should feel free to experiment with the seasoning. Maybe try adding some jalapeños or beer (hint, hint).

The key is finding the freshest green peanuts that you can. They’ll cook quicker and taste better.

Spicy Cajun Boiled Peanuts
2014-10-29 13:41:18
Boiled peanut perfection! Spicy and salty with that great boiled peanut flavor.
Write a review
Save Recipe
Print
Prep Time
5 min
Cook Time
2 hr
Prep Time
5 min
Cook Time
2 hr
Ingredients
  1. 2 pounds green peanuts, picked over
  2. 1/4 C salt
  3. 1/4 C cajun seasoning
Instructions
  1. Place the peanuts in a large pot and cover with water.
  2. Add salt and cajun seasoning and boil (over high heat) until done. Hulls should be easy to open and peanuts should be soft, but not mushy. Cooking time depends largely on the freshness of the peanuts, but figure 2-4 hours.
  3. Keep adding water as necessary to keep peanuts submerged.
  4. Store in large plastic bags, with a little of the cooking liquid, in the fridge for up to 3 days. Reheat in microwave.
Notes
  1. Experiment with your own seasonings and flavorings to make this recipe your own.
  2. IMPORTANT: Boiled peanuts will continue to absorb salt from the cooking liquid after you turn off the heat. If your peanuts need to be saltier, just let them sit. If they are salty enough already then don't let them sit in the liquid.
By Saved by the Kale
Saved by the Kale https://savedbythekale.com/

How to Eat Boiled Peanuts

I like to put a bunch of boiled peanuts in a bowl and add a little extra cajun seasoning (or salt) on top. You’ll want to make sure some of the peanut cooking liquid is in the bowl too… it’s tasty. Crack open the peanuts and enjoy. Don’t eat the shells.

Cajun Boiled Peanuts recipe


Have you ever seen or tried boiled peanuts? Let me know in the comments!

Filed Under: Recipes, Snacks, Tailgating Tagged With: boiled peanuts, cajun, peanuts, Southern, tailgating

Honey Roasted Pumpkin Seeds

November 5, 2014

We love carving a couple of pumpkins each year for Halloween and now that our girls are getting a little older they are enjoying it too. Well actually they both think it is disgusting reaching in to the pumpkin to pull out the seeds and the flesh. They are a little grossed out by it. Luckily Jim and I don’t mind. He scoops out the flesh and I work on separating the seeds so I can roast them up to have as delicious healthy snack! 

Really the most tedious part of the process is separating the seeds from the flesh, once you’ve done that it’s a piece of cake. You will want to rinse the seeds off, and then place them on a paper towel and blot them dry. What I do is leave mine on the paper towel on the counter overnight so they can dry out. 

PumpkinSeeds-4-2

The next day they are ready for roasting! I decided to do something a little different with mine this year. In the past I have made sweet ones using cinnamon and sugar. I’ve also made savory ones using different seasonings, and I have also made spicy ones. This year I decided on making Honey Roasted Pumpkin Seeds! I couldn’t wait for these to come out of the oven so I could taste test… they had the entire house smelling so good! 

Honey Roasted Pumpkin Seeds

They tasted even better than they smelled, I had to stop myself from eating them so I would have some left to photograph! These are sweet and savory at the same time. The best of both worlds. They are naturally sweetened with honey, so no refined sugars here! 

PumpkinSeeds-18-Edit

Why eat pumpkin seeds? Pumpkin seeds are incredibly good for you. They are packed with magnesium, zinc, and omega 3’s. They are rich in healthy fats, antioxidants, and fiber and they taste delicious! They are definitely the perfect fall snack.

Honey Roasted Pumpkin Seeds
2014-10-29 16:18:59
Crunchy, sweet and savory! The perfect healthy fall snack!
Write a review
Save Recipe
Print
Cook Time
30 min
Cook Time
30 min
Ingredients
  1. 1/2 cup of pumpkin seeds
  2. 2 tsp of honey
  3. 1 tsp of coconut oil (melted)
  4. 1/4 tsp sea salt
Instructions
  1. Separate the pumpkin seeds from the flesh.
  2. Rinse seeds and put them on a paper towel and blot dry.
  3. Let them air dry overnight or for a few hours.
  4. Once they are dry, put them in a bowl.
  5. Preheat the oven to 300 degrees.
  6. Add honey, coconut oil, and salt to the bowl and stir all together.
  7. Line a baking sheet with non-stick foil.
  8. Pour the seeds onto the baking sheet.
  9. Bake in the oven for at 300 degrees for 30 minutes.
  10. Once they come out of the oven sprinkle with a little more sea salt, let them cool and then snack away!!!
By Jen @ SavedbytheKale
Saved by the Kale https://savedbythekale.com/

Filed Under: Featured, Pumpkin Everything, Recipes, Snacks Tagged With: honey roasted, pumpkin, pumpkin seeds

  • « Previous Page
  • 1
  • 2
  • 3
  • Next Page »

Hi there!

Hi guys, it's Jen!

I love good food and simple living! Keep Reading…

Search Saved by the Kale

  • Email
  • Facebook
  • Instagram
  • Pinterest
  • RSS
  • Twitter
Follow on Bloglovin

Tasty Food Photography eBook

Features

Infinity Jars

Healthier Alternatives to Store Bought Spice Blends

Cast Iron Pan Pizza Recipe

Homemade Buffalo Chicken Pan Pizza

Chocolate Pumpkin Bread Recipe

Chocolate Chocolate Chip Pumpkin Bread

Copyright © 2025 · Foodie Theme by Shay Bocks · Built on the Genesis Framework · Powered by WordPress