Saved by the Kale

Healthy living is Happy living

Navigation
  • Home
  • Recipes
    • Appetizers
    • Breakfast
    • Entrees
    • Desserts
    • Gluten Free
    • Juices
    • Side Dish
    • Smoothies
    • Snacks
  • Minimalism
  • About
    • About Jen
    • About Jim
  • Jen’s Favorites
  • Mindful Intentions
  • Contact

Vietnamese Fresh Basil Spring Rolls

January 27, 2016

These rolls are fresh and loaded with flavor and  veggies! You will not be able to eat just one, I promise! Bonus: these rolls are very healthy and will fit almost any kind of diet. They are gluten free and vegan. This recipe is also great for anyone on an elimination diet.

spring rolls

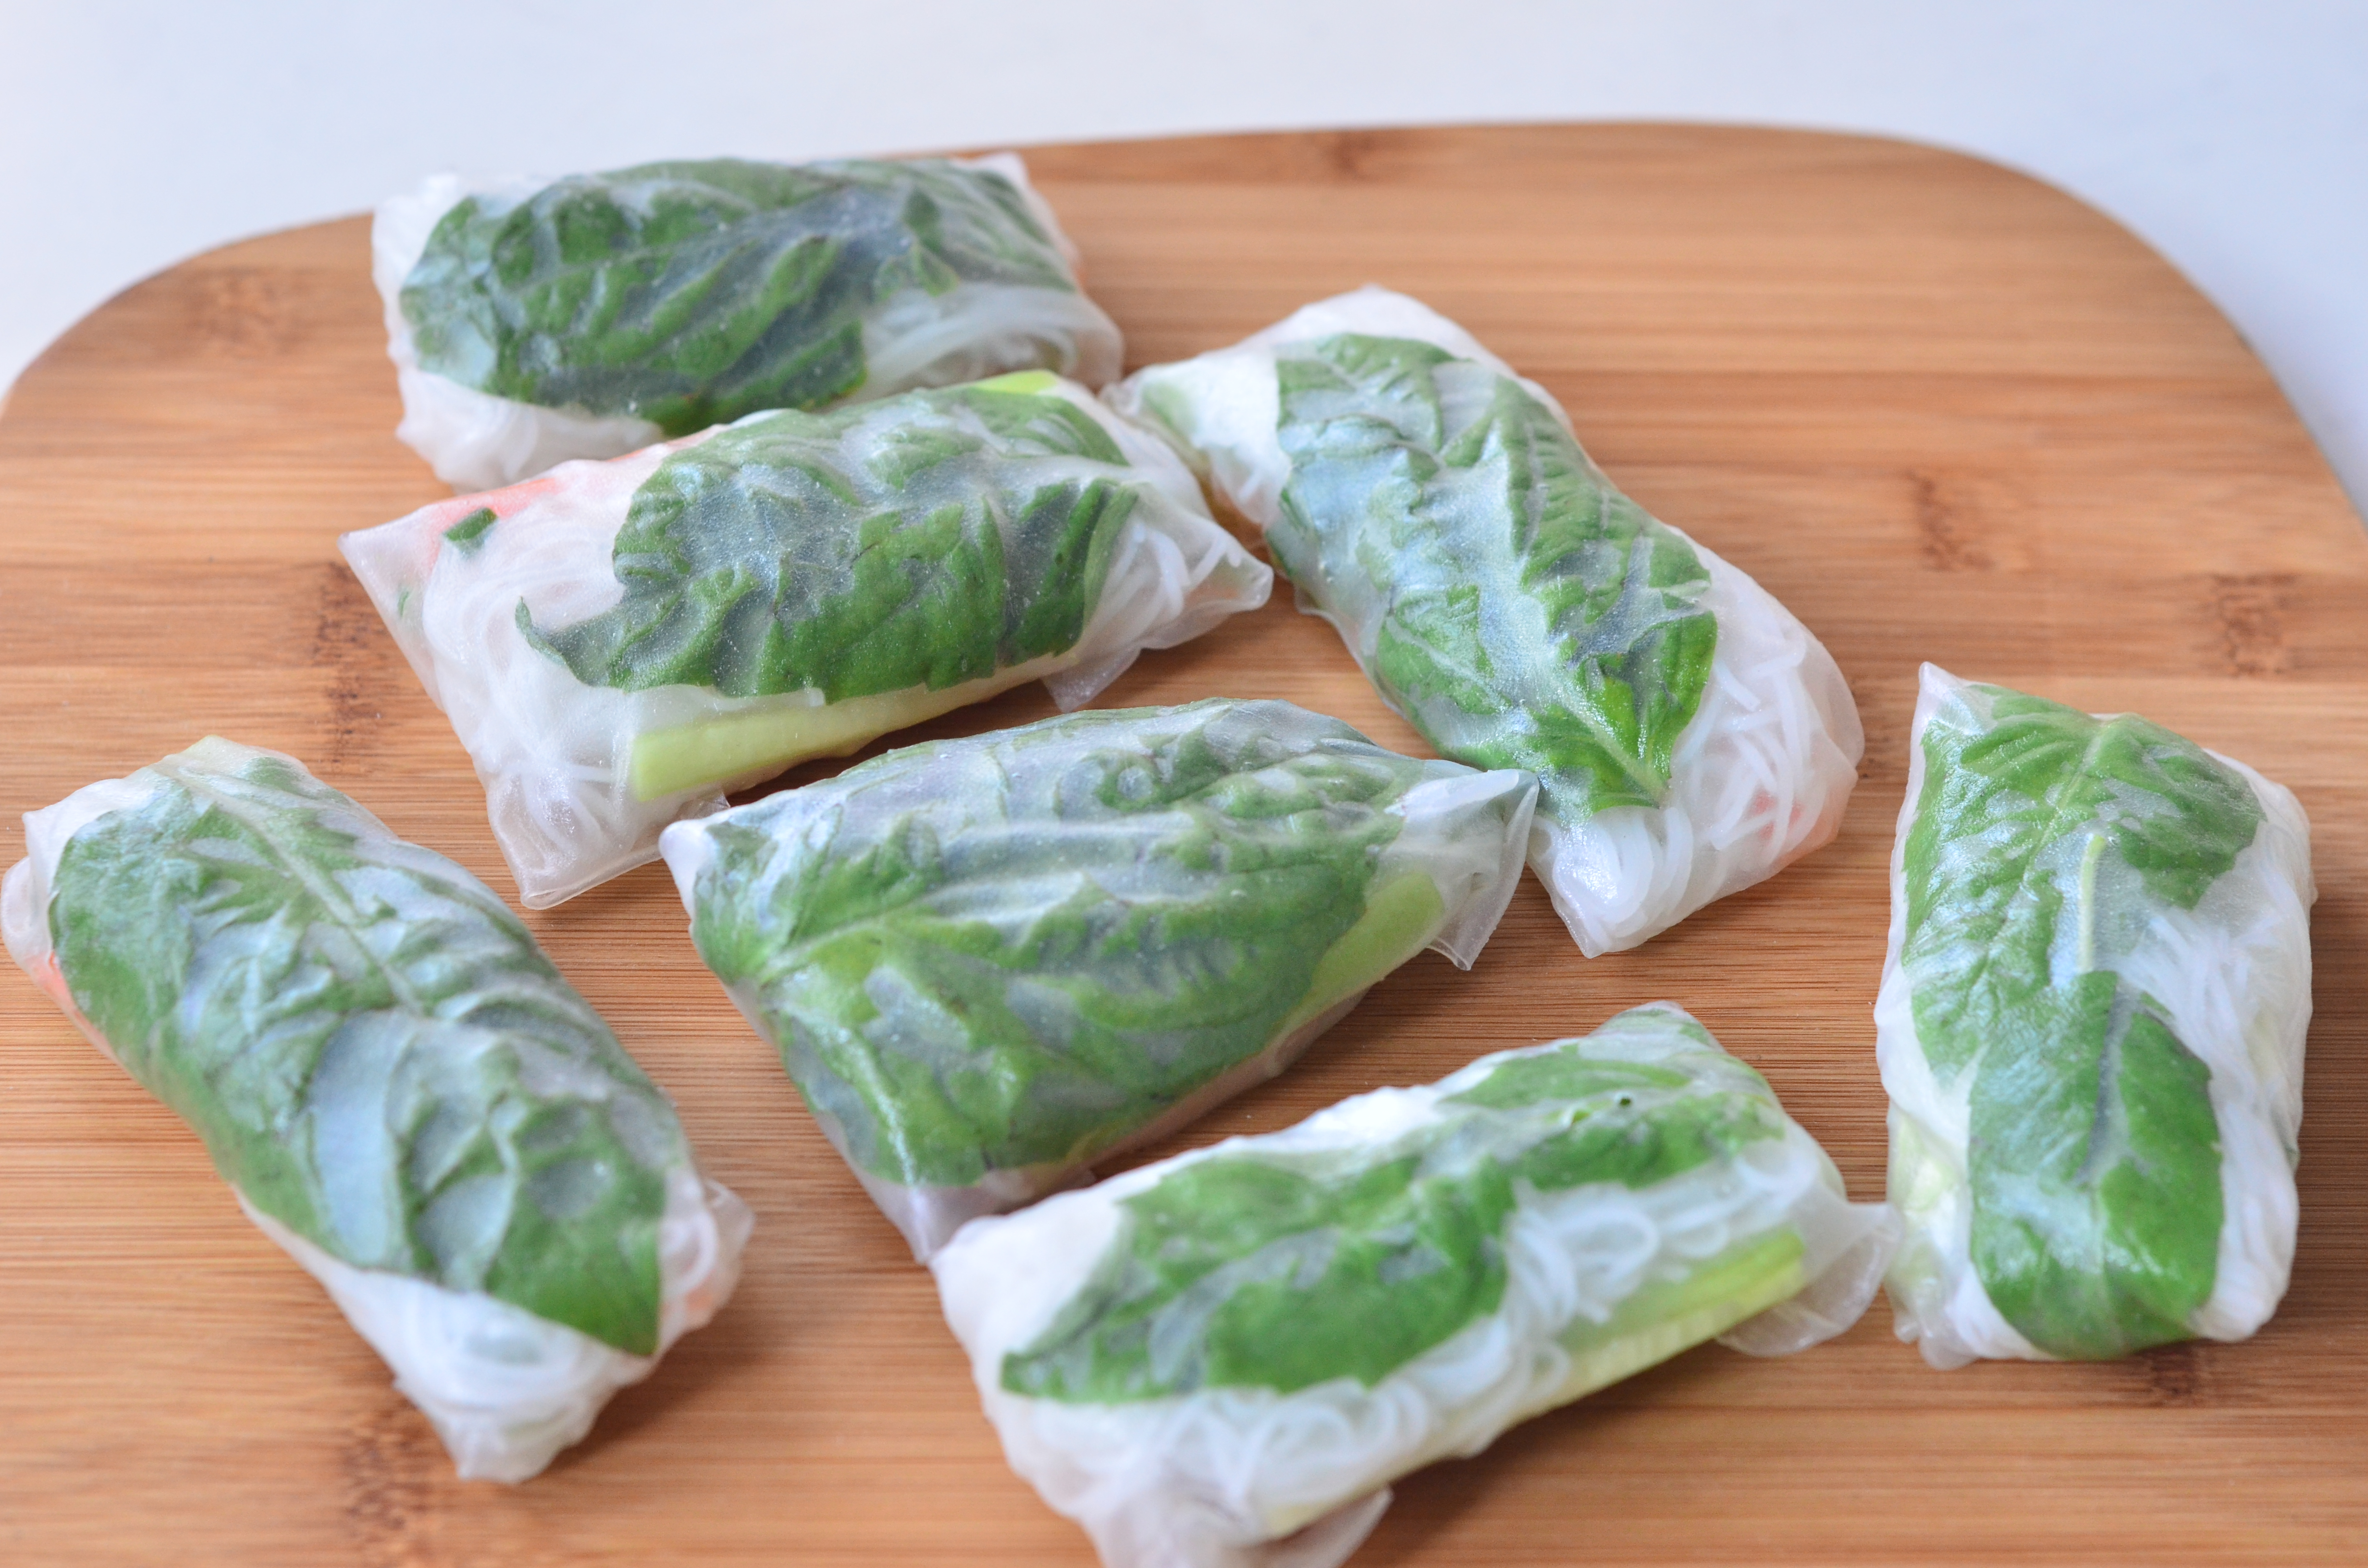
I know we are in the middle of winter but that doesn’t mean it’s not the perfect time to eat something fresh and light. These rolls are so versatile. I love to use basil in mine, but they would also be great with fresh mint or cilantro. You could switch out the veggies, play around and make it to your particular taste. 

fresh veggies for spring rolls

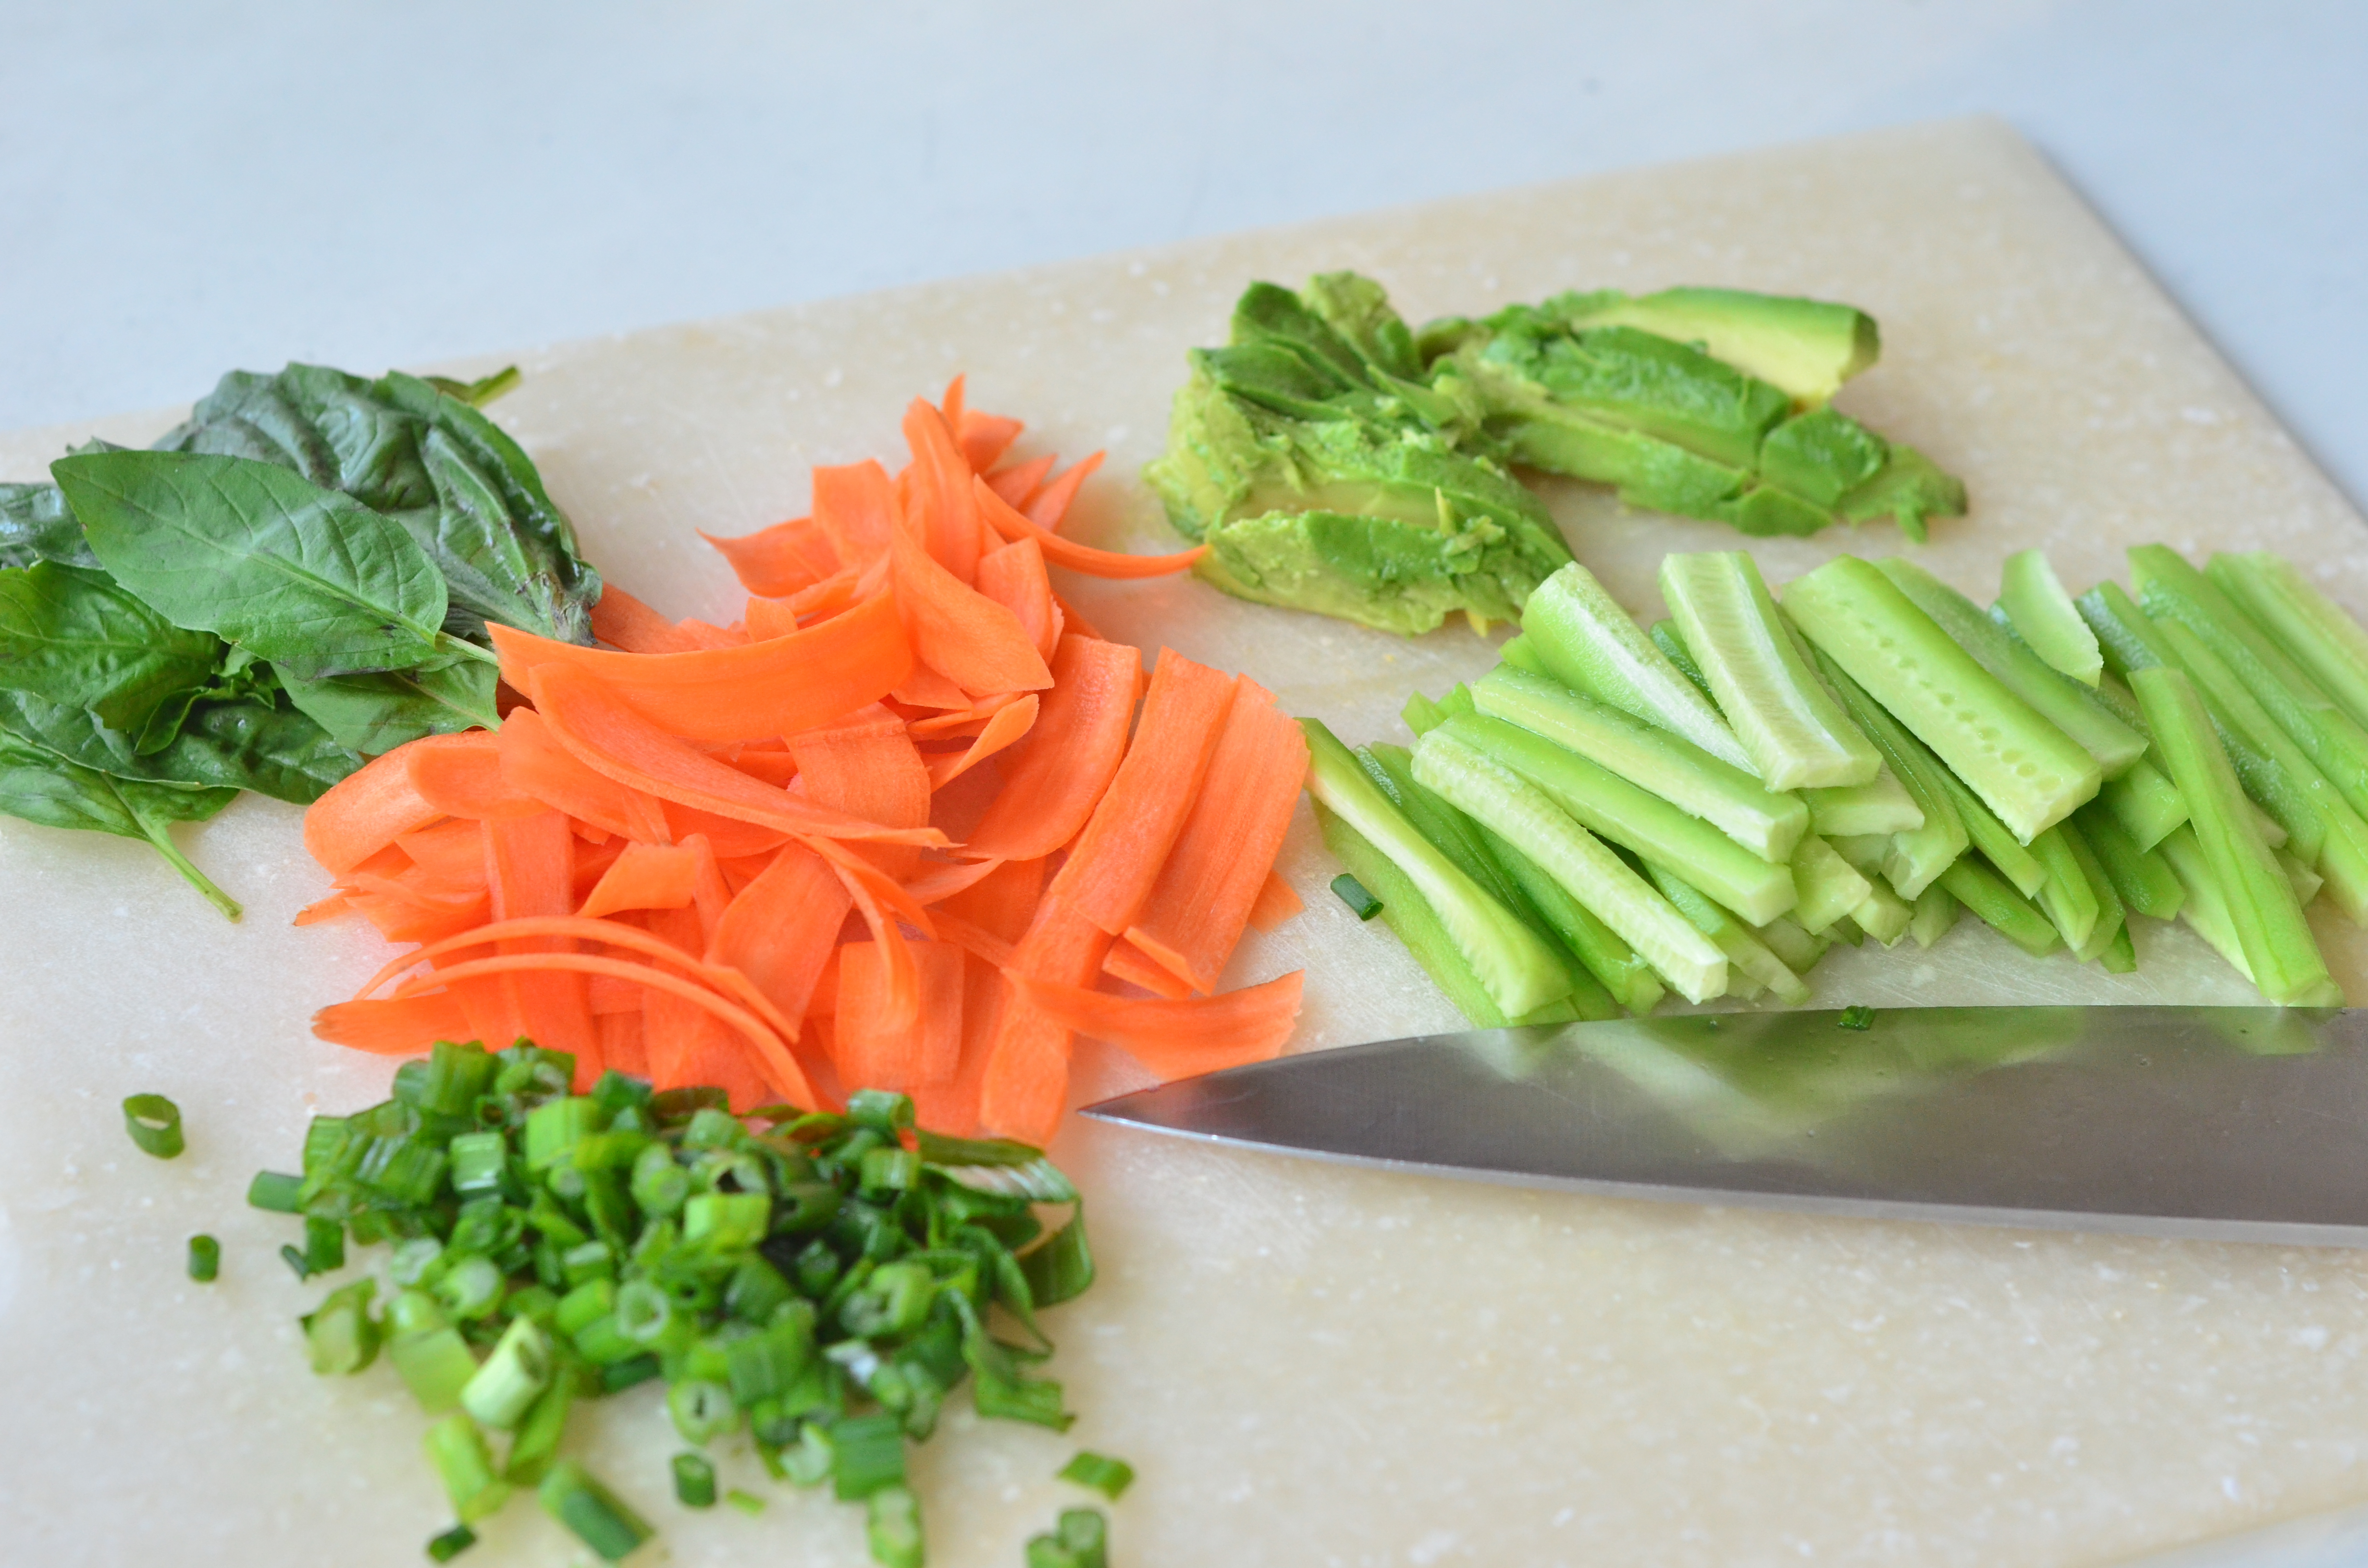
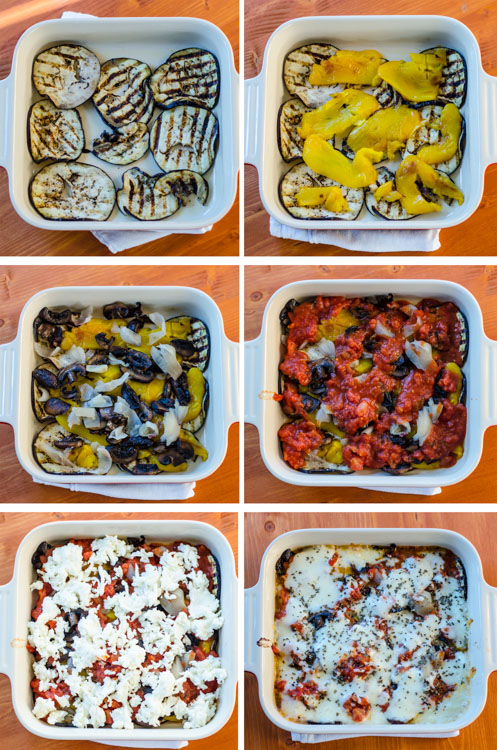
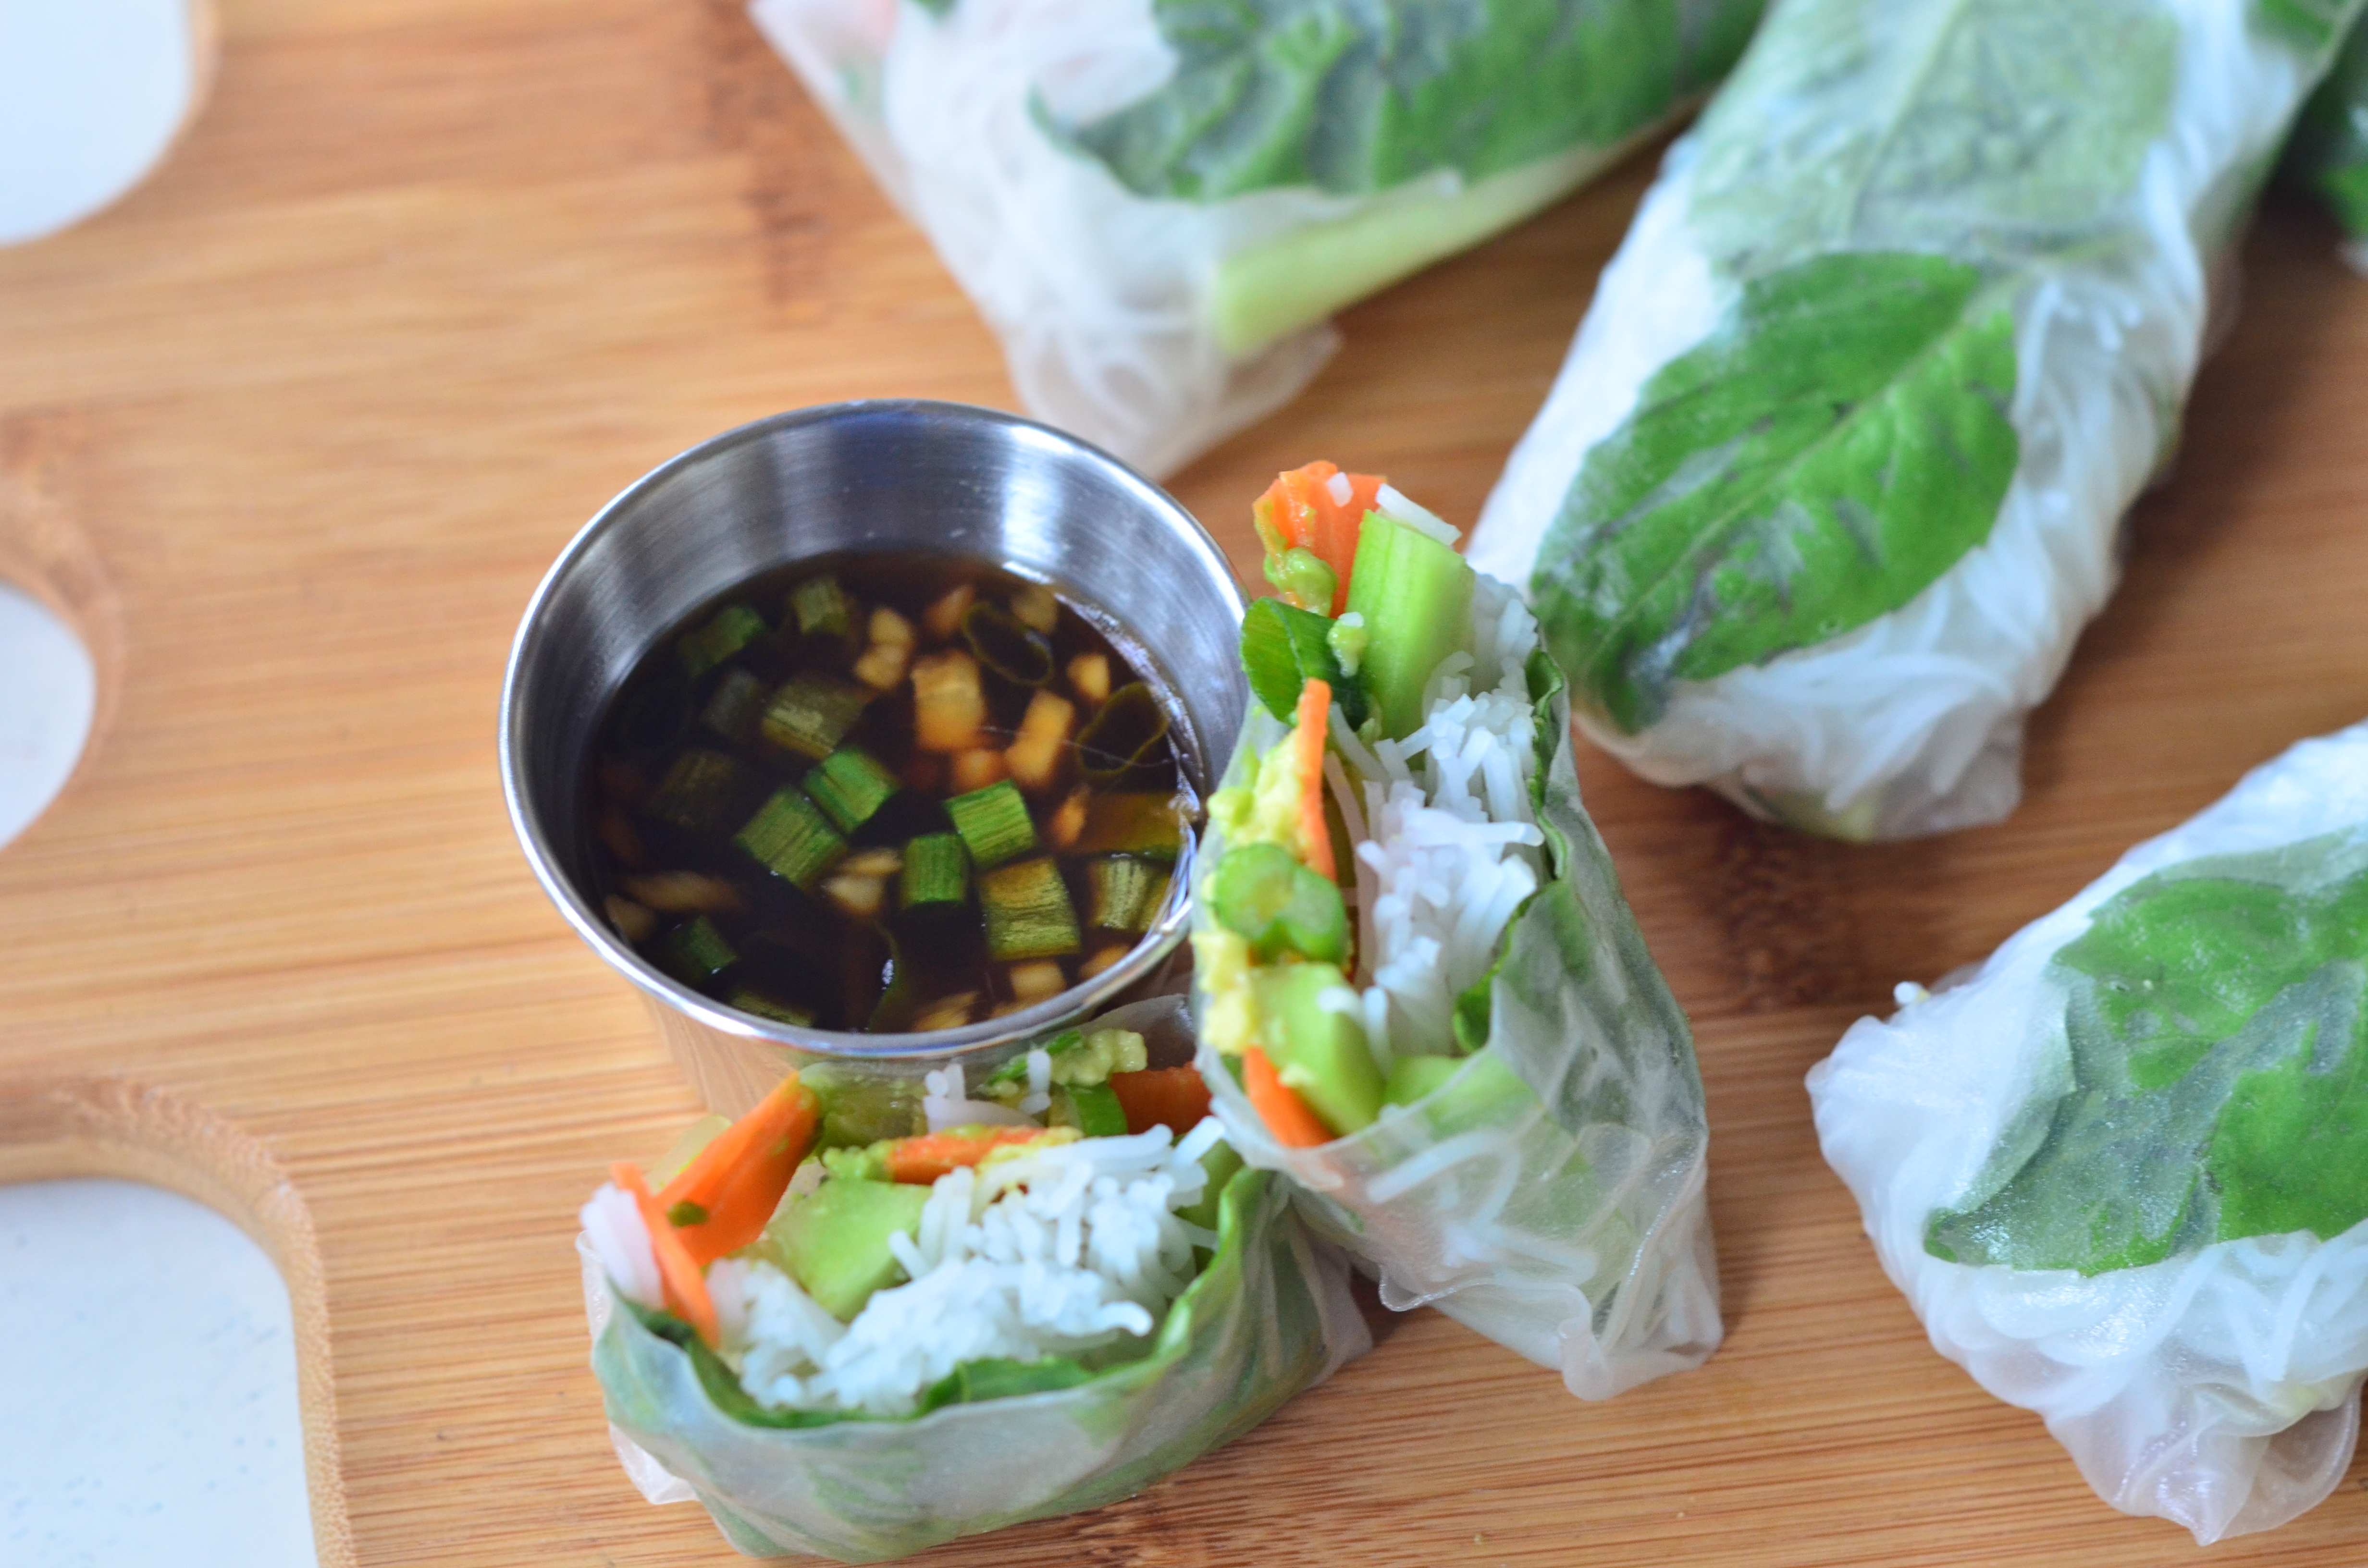
These came together very quickly. It’s a good idea to have all your veggies chopped up before you get started putting your rolls together. I find it works best to put all your fillings together in the middle of the wrap and then roll it up tight like a burrito. The rice paper is very flexible just make sure you do not get it too soft or it will rip when you try to roll it together, but if you follow the directions according to the package it will work great!

Vietnamese Spring Rolls

Soy is off limits to me but I have found I love Coconut Aminos even more and it is the main ingredient for the sauce to dip these delectable rolls in. 

Vietnamese Fresh Basil Spring Rolls
2016-01-21 18:32:23
Yields 10
These rolls are filled with fresh veggies and are perfect as an appetizer or a meal.
Write a review
Save Recipe
Print
For the Rolls
  1. 2 carrots (shaved with a vegetable peeler)
  2. 2 cucumbers (sliced thinly)
  3. 1 avocado (sliced)
  4. handful of fresh basil
  5. 2 green onion tops
  6. thin rice noodles
  7. 10 Vietnamese spring roll rice wrappers
For the Sauce
  1. 1 tsp of minced garlic
  2. 1 tsp of chopped ginger
  3. 1/3 cup of coconut aminos
  4. 1 green onion top
Instructions
  1. Begin by chopping all the vegetables.
  2. Then cook the rice noodles according to the directions on the package.
  3. When the rice noodles are done get a bowl of warm water to prepare the rice wrappers.
  4. Dip the wrappers into the warm water until they begin to get soft. You want them soft but still a little firm because they will soften up as you are working with them,
  5. Lay the wrapper out flat on a cutting board and put all your veggies, basil and the rice noodles in the middle of the wrapper. Roll them up like you would a burrito. You can fold them ends in or leave them open. Be sure that you do not stack the completed rolls as they will stick together.
  6. To make the sauce you will need a small sauce pan. Combine all the ingredients and gently cook for about 5 minutes and you are done!
Notes
  1. If you have left over rolls you can wrap them each individually in saran wrap and store in the refrigerator up to two days.
By Jen @ SavedbytheKale
Saved by the Kale https://savedbythekale.com/


Filed Under: Appetizers, Elimination Diet, Entrees, Gluten Free, Meatless, Recipes Tagged With: dairy free, elimination diet, fresh, gluten free, soy free, vegan, vegetarian, vietnamese spring rolls, wheat free

No Bake Chewy Date Bars

January 11, 2016

No Bake Chewy Date Bars

I knew when I went on this elimination diet that I was going to have to come up with some good alternatives for that something sweet that I love to have at night. These date bars were just that. It’s funny that up until about a year ago I have never even tasted a date and now I buy them in bulk and use them almost daily. They are nature’s candy and just perfect. 

These bars are sweet, but have no added sugar and they have a slightly salty crunchy top and bottom with a soft chewy center. You can store them in the refrigerator or the freezer but I prefer the freezer, they are more firm that way. I love grabbing one for a quick breakfast or snack. It is so important for me to have some healthy options around for when a craving hits so that I won’t open the pantry and eat all the chocolate. 🙂 No seriously, it has happened! 

No Bake Chewy Date Bars

If you are looking for a healthy dessert that does not contain gluten, dairy, soy, sugar, or eggs and only takes about 10 minutes to make then do your self a favor and make these today! 

No Bake Chewy Date Bars
2016-01-04 23:48:56
Yields 10
Write a review
Save Recipe
Print
Prep Time
5 min
Cook Time
5 min
Prep Time
5 min
Cook Time
5 min
For the crust/crumble
  1. 1 1/2 cups Gluten Free Rolled Oats
  2. 1 1/2 cups Organic Brown Rice Crisps
  3. 8 Medjool dates, pitted and chopped
  4. 1/4 cup coconut oil, melted
  5. 1/2 tsp salt
For the filling
  1. 2 cups of Medjool dates, pitted
  2. 1/2 cup water
  3. 1/2 tsp vanilla
  4. 1/4 tsp salt
Instructions
  1. Line an 8x8 baking dish with parchment paper or foil.
  2. Using a food processor pulse the oats and brown rice crisps together until finely ground.
  3. Add in the chopped dates, coconut oil and salt and process until a dough is formed.
  4. Set aside 1 cup of the dough to use as the topping.
  5. Line the baking dish with the rest of the dough, using your fingers to gently press the dough down into the bottom of the pan.
  6. For the filling, combine all of the ingredients into the food processor and process until everything is broken down.
  7. Spread the filling over the crust evenly, then crumble the rest of the topping on the date filling using your fingers to gently press down.
  8. Then cover and place the bars in the freezer for an hour and then enjoy! Store the bars in the freezer.
By Jen @ SavedbytheKale
Adapted from http://detoxinista.com
Saved by the Kale https://savedbythekale.com/

Filed Under: Desserts, Elimination Diet, Gluten Free, Snacks Tagged With: chewy date bars, dairy free, dates, elimination diet, gluten free, soy free, sugar free, vegan

Savory Roasted Plantains

January 3, 2016

Savory Roasted Plantains Recipe

I remember the first time I had a plantain. It was about 7 years ago, we were vacationing in Boca Raton.  We were staying at this fantastic resort and had a cabana for the day complete with a crib for Lily she was around 9 months at the time. I don’t know what it is about being out in the sun and swimming that makes me want to eat everything in sight but it does.  I decided to order a plate of guacamole, yuca, and plantains. The thing is at the time I thought I didn’t like guacamole, and I had never tried yuca or plantains, but at that moment it all looked great! I devoured it and I was in love. Now it is rare that a day goes by that I do not eat an avocado and almost every week I make plantains. 

Savory Roasted Plantains Recipe

They are so easy to make and are delicious. You can make them sweet or savory. Most of the time I go with savory, although they are fantastic either way. I love to have them when I make rice, black beans, and guacamole. Don’t forget the hot sauce. That is a perfect meal to me!

Savory Roasted Plantains
2016-01-01 20:44:53
Serves 2
Delicious and healthy savory plantains!
Write a review
Save Recipe
Print
Prep Time
2 min
Cook Time
23 min
Total Time
25 min
Prep Time
2 min
Cook Time
23 min
Total Time
25 min
Ingredients
  1. 1 plantain
  2. 1-2 tbsp of coconut oil (melted)
  3. 1/2 tsp of garlic powder
  4. salt and pepper to taste
Instructions
  1. Preheat the oven to 415 ºF. Peel the plantain, then cut the plantain in half and then cut each half into fourths. Put the plantains in a bowl then pour the coconut oil over them. Add the garlic, salt and pepper. Toss them all together. Put the plantains on a baking sheet (I line mine with foil to make cleaning up easier). Bake them for 23 minutes, turning them halfway through. Enjoy!
Notes
  1. Plantains are great by themselves as a side dish or with salsa or guacamole.
By Jen @ SavedbytheKale
Saved by the Kale https://savedbythekale.com/

Filed Under: Appetizers, Elimination Diet, Gluten Free, Side Dish, Snacks Tagged With: dairy free, gluten free, paleo, plantains, roasted plantains

Best Roasted Vegetable Lasagna

November 3, 2014

Happy November! I hope the weather is still nice where you live. It’s been absolutely gorgeous around here lately, especially for Halloween! We’ve eaten way to much candy lately, so it’s definitely time for something a little healthier….

Jim and I are going to start making a conscious effort to have more meatless meals. Jim’s a big-time “meat-a-tarian” (as he calls himself), so meatless meals are quite an adjustment for him. Most of the time he will say that he likes my meatless creations when we’re eating them only to say the exact opposite when I bring up the idea of making them again. I am perfectly fine eating several meatless meals a week… it’s not as big a deal to me.

So we’re working on coming up with a few meatless meals that we can keep start working into our busy weeknight schedules. We’re off to a good start… we made a roasted vegetable lasagna for dinner a couple of nights ago and it was a winner. Jim even suggested that we make it again next week!

Roasted vegetable lasagna recipe

It’s a meatless “lasagna”. There are plenty of veggie layers, but no lasagna noodles. So it’s gluten-free & grain-free. 

Roasted vegetable lasagna recipe

Lots of veggies here, including grilled eggplant, roasted yellow bell peppers, roasted mushrooms, and roasted shallots. You could actually taste every single veggie in there. The star here was definitely the eggplant (it wasn’t actually roasted, Jim cooked it up in his grill pan). 

Roasted veggie lasagna recipe

Best Roasted Vegetable Lasagna
2014-10-29 21:00:33
Serves 2
Roasted veggies and grilled eggplant make this "lasagna" a winner. No carbs here!
Write a review
Save Recipe
Print
Prep Time
45 min
Cook Time
15 min
Total Time
1 hr
Prep Time
45 min
Cook Time
15 min
Total Time
1 hr
Ingredients
  1. 1/2 Eggplant, cut into thin rounds
  2. 1 large shallot, split in half
  3. 2 yellow bell peppers, sliced into quarters and seeded
  4. 1 C baby portabello mushrooms, sliced
  5. 1 C shredded mozzarella
  6. 1 C tomato sauce
  7. Olive Oil, Salt & Pepper as needed
  8. 1 Tsp dried basil
Instructions
  1. Preheat oven to 425F.
  2. Saute (or grill) eggplant with a bit of olive oil. Season with salt and pepper.
  3. Wrap shallot in foil with about 1 tsp of olive oil and season with salt. Cook for 20 minutes, or until soft.
  4. Place bell pepper on a baking pan lined with foil. Roast for 30 minutes, or until skin starts gets slightly blackened.
  5. Place mushrooms on a baking pan lined with foil. Sprinkle with olive oil, salt, and pepper. Roast for 30 minutes, or until browned.
  6. Change oven temp to 350F.
  7. Remove the skin from the bell pepper as much as possible. Remove the skin from the shallot and chop roughly.
  8. In a baking dish, layer eggplant, bell pepper, mushrooms, and shallots. Spoon tomato sauce over veggies and then cover with cheese. Sprinkle basil on top.
  9. Bake for 15 minutes.
Notes
  1. There are a lot of veggies here, so there's a chance that this can get watery. Just spoon out any liquid that cooks out.
By Saved by the Kale
Saved by the Kale https://savedbythekale.com/
 Roasted vegetable lasagna recipe

 What are your favorite meatless meals? Do you do Meatless Mondays? Tell us about it in the comments!

Filed Under: Entrees, Gluten Free, Meatless, Recipes Tagged With: lasagna, meatless, roasted, roasted veggies, vegetable, veggie

  • « Previous Page
  • 1
  • 2
  • 3
  • 4
  • Next Page »

Hi there!

Hi guys, it's Jen!

I love good food and simple living! Keep Reading…

Search Saved by the Kale

  • Email
  • Facebook
  • Instagram
  • Pinterest
  • RSS
  • Twitter
Follow on Bloglovin

Tasty Food Photography eBook

Features

Infinity Jars

Healthier Alternatives to Store Bought Spice Blends

Cast Iron Pan Pizza Recipe

Homemade Buffalo Chicken Pan Pizza

Chocolate Pumpkin Bread Recipe

Chocolate Chocolate Chip Pumpkin Bread

Copyright © 2025 · Foodie Theme by Shay Bocks · Built on the Genesis Framework · Powered by WordPress